Crochet Witch Hat Pattern (Easy Halloween Mini Hat Decor)
By Lara Yanki · September 16, 2026 · in Blankets & Home Decor
A complete mini crochet witch hat pattern with a pointed cone, brim, contrasting band, and decorative finishing ideas.
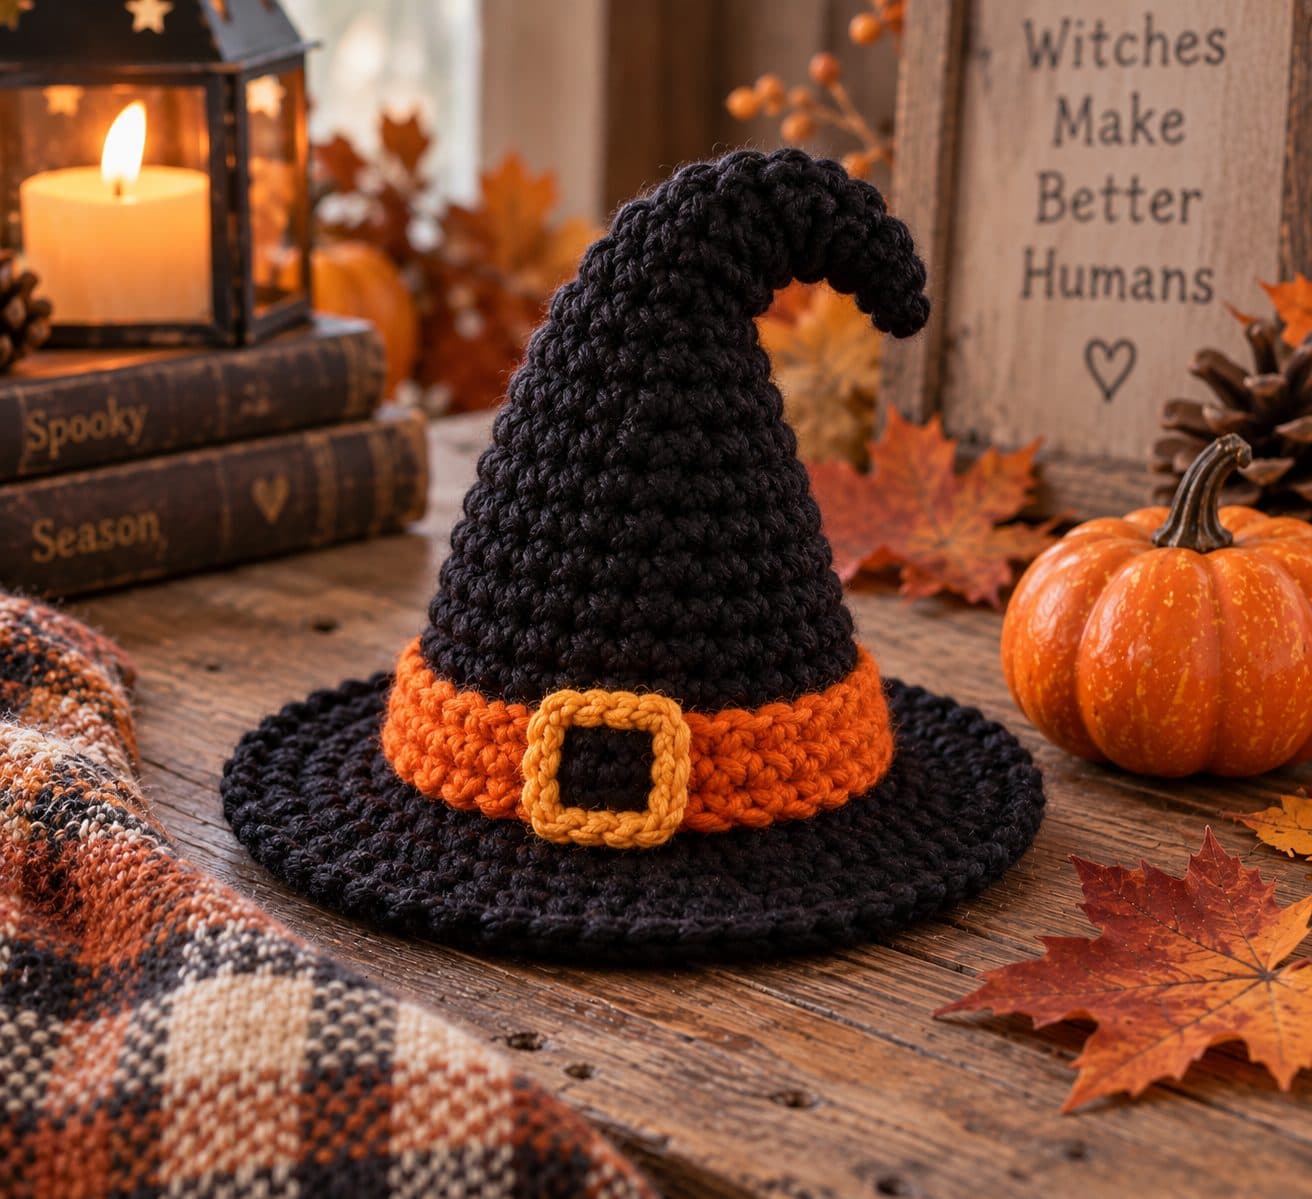
AI-generated illustration. Your finished project may look different.
This mini witch hat is one of the quickest Halloween makes you can do — one small cone, a flat brim, and a contrasting hat band. Use it to top a pumpkin, sew it onto an amigurumi character, hang it on a wreath, or add a loop and turn it into an ornament.
It is worked in a continuous spiral (no joining) from the tip down, so there is very little sewing and only two ends to weave in.
What you need
- Worsted weight yarn in black (about 20g) for the hat
- A small amount of purple, orange, or green worsted yarn (about 5g) for the hat band
- 4.0mm (G-6) crochet hook
- Yarn needle
- A stitch marker
- Optional: a short piece of pipe cleaner (about 3 in / 8 cm) to hold the bent tip
- Optional: a small piece of cardboard or stiff felt for a firmer brim
Abbreviations
This pattern is written in US terms.
- MR — magic ring
- sc — single crochet
- inc — increase (2 sc in the same stitch)
- st(s) — stitch(es)
- ( ) — the number at the end of a round is your stitch count
Size and notes
The finished hat is about 4 in (10 cm) tall and 4.5 in (11 cm) across the brim, worked at a firm gauge. Crochet tightly: a dense fabric is what lets a mini hat hold its shape without stiffener. If your stitches look loose, drop down a hook size.
Work in a continuous spiral and mark the first stitch of each round with a stitch marker.
Crochet the pointed cone
The cone is worked from the tip down to the base, using black yarn.
Round 1
Make a magic ring and work 6 sc into it. (6)
Round 2
(1 sc, inc) x 3. (9)
Round 3
sc in every stitch around. (9)
Round 4
(2 sc, inc) x 3. (12)
Round 5
sc in every stitch around. (12)
Round 6
(3 sc, inc) x 3. (15)
Round 7
sc in every stitch around. (15)
Round 8
(4 sc, inc) x 3. (18)
Round 9
sc in every stitch around. (18)
Round 10
(5 sc, inc) x 3. (21)
Round 11
sc in every stitch around. (21)
Round 12
(6 sc, inc) x 3. (24)
Round 13
sc in every stitch around. (24)
Crochet the hat band
Change to your contrasting yarn on the last stitch of Round 13 so the colour change stays clean.
Round 14
sc in every stitch around. (24)
Round 15
sc in every stitch around. (24)
Change back to black on the last stitch of Round 15.
Crochet the brim
The brim flares out from the base of the cone.
Round 16
(1 sc, inc) x 12. (36)
Round 17
(2 sc, inc) x 12. (48)
Round 18
sc in every stitch around. (48)
Slip stitch into the next stitch, then fasten off and weave in your ends.
Shape the bent tip
A slightly drooping tip is what makes it read as a witch hat rather than a plain cone.
- Push the pipe cleaner up inside the cone until it reaches the tip.
- Bend the top 1 in (2.5 cm) of the cone over to one side.
- If you skip the pipe cleaner, stuff the tip very lightly and tack the tip to the side of the cone with one hidden stitch.
Make the brim firmer (optional)
If you want a crisp, flat brim, cut a circle of cardboard or stiff felt slightly smaller than the brim, slide it in through the open base of the cone, and stitch a few loose stitches around the inside to hold it flat. For a hat that will hang outdoors, skip the cardboard and use felt.
Witch hat colour ideas
- Classic: black hat with an orange band
- Purple witch: deep purple hat with a black band and a gold-yellow embroidered buckle
- Sweet and spooky: black hat with a pink or mint band
- Forest witch: dark green hat with a cream band
- Christmas twist: red hat with a white band and a small white pom-pom on the tip
Other ways to use your mini witch hat
- Pumpkin topper: sit it on a real mini pumpkin or on the crochet pumpkin
- Wreath accent: sew it onto a Halloween wreath beside the witch broom ornament
- Amigurumi accessory: make it slightly larger and sew it onto a doll, a ghost, or the black cat
- Ornament or gift topper: sew a loop of yarn to the tip and hang it, or tie it onto a gift
- Garland: make a batch in different colours and thread them on twine
- Wear one: for a hat that fits a head, see the witch costume hat
Frequently asked questions
Can I make the hat bigger?
Yes. Keep repeating the increase pattern in the cone (add 3 stitches every other round: 27, 30, 33...) until the base is as wide as you want, then work the band and brim with a matching number of increase rounds.
Do I have to use worsted weight yarn?
No. Any yarn works if you match the hook to it. Thinner yarn gives a smaller, more delicate hat; chunky yarn gives a big hat that works as a decoration on its own.
How do I stop the brim from curling?
Work the brim at a tighter tension, add the felt or cardboard insert, or give it a light spray of fabric stiffener and let it dry flat.
More in Blankets & Home Decor
Crochet Blanket Guide for Beginners
A plain single-crochet rectangle is a useful first blanket because you can change its width and length without recalculating a complicated repeat.
2 min read
Crochet Flower Bouquet Guide: Roses, Tulips & Daisies
A crochet bouquet combines separate flower heads with supported stems.
2 min read
Crochet Pumpkin Home Decor: Easy Fall Crochet Guide
Crochet pumpkins get their shape from a gathered fabric tube and strands that divide the stuffed body into lobes.
2 min read